Showing posts with label CAbi. Show all posts

Friday, March 23, 2012

V8151 || CAbi Wrap Top Knockoff

Spring/Summer 2012 CAbi Abstract Wide V-Tee, $69.
Who doesn't adore a good wrap top? CAbi has been throwing this cute top into the mix for the past five years in some form or another. I've always loved this style of top, so it was time to make my own... just in time for St. Patrick's Day!


V8151 Pattern Description: Pullover tops with set in sleeves. Wrapped front, band, shirred sides and long sleeves.

Pattern Sizing: A-J. Mine is a C with modifications (below). 

 
It's totally easy being green!
Did it look like the photo/drawing on the pattern envelope once you were done sewing with it? It does! Although, after seeing this picture, I may take in the sides even further. Since I'm an addict, I want even more rusching!

Were the instructions easy to follow? Sandra Betzina directions are always easy to read and follow. Love her!

What did you particularly like or dislike about the pattern? It's really easy and quick to make. After adding 1" to the neckline, it's STILL lower than I'm comfortable with, so I'll have to either wear a tank under this or grab my trusty safety pin. I'll fix that next time.

Fabric Used: Something new! I've been searching for a good kelly green fabric since I made this top awhile ago. I found this tissue-weight silk and lycra jersey at the Sewing Expo in Puyallup this year. 


Pattern alterations or any design changes you made: I removed .5" from the shoulder, added .5" high round back, 1.5" to the sleeve length, 2" to the front and back length and opted out on the bust darts in favour of gathering that section instead. I'll def. do that again. Bust darts in shifty fabric are tricky! Next time, I'll add an additional 2" to the hem. I like my tops a little longer.


Would you sew it again? Would you recommend it to others? Yes I would! I'd love one in every colour of the rainbow.

Conclusion: This is a great, versatile style that is sure to be in heavy rotation. LOVE it!

Friday, December 16, 2011

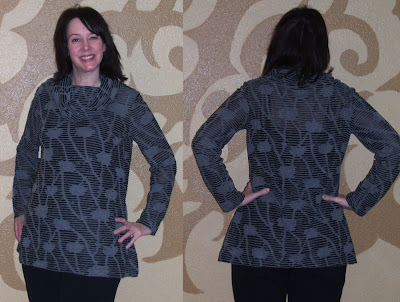
V1261 || Slashed Tunic (CAbi Cozy Tunic Knockoff)

$98 for this adorable tunic? I don't think so!
I've been lusting after the CAbi Cozy Tunic since I first spied it in fall of 2009. Time to make my own!


V1261 Pattern Description: Close fitting. Double needle stitching. A,B: Armhole seams on outside; self binding; ribbon on back; unfinished edges will show. C: neck binding. 

Pattern Sizing: XS-XL. Mine is View B, Large. 

Did it look like the photo/drawing on the pattern envelope once you were done sewing with it? Somewhat. It looks more like my CAbi Cozy Tunic inspiration.

Were the instructions easy to follow? After reading other reviews on Pattern Review, I knew to toss out the instructions and do it myself. Seriously, they're crap. If you've made a top before, the construction is not complicated.

What did you particularly like or dislike about the pattern? It came together quickly once I tossed out the overly-complicated instructions.

Fabric Used: Slashed sweater knit from Marcy Tilton. This was, hands down, the most expensive fabric I purchased in 2011. I'm glad I used it. Her fabrics are amazing.

Pattern alterations or any design changes you made: I added 3" to the sleeve length, 4" to the tunic body, straightened the hem, doubled the cowl (I like a full "cowly" cowl), cut the back piece on the fold and used a 1/4" serged seam allowance. 


Mmmmmm, cozy!
Would you sew it again? Would you recommend it to others? I've got quite a few cowl necks in my wardrobe, but this is a good pattern, if you toss out the crummy instructions.

Conclusion: I love this tunic!

Monday, July 4, 2011

Swingin' 70s Pool Party Dress


CAbi Sigourney Skirt ($98)
 Isn't this the cutest dress for summer? Last weekend, I went to a CAbi end-of-season sale (50-70% off? Yes, please!) and tried it on. The sample was a little....generous(?) in the bust, but after looking at the simple construction, I figured I'd try my hand at making my own.

It took nearly 1-1/2 yards of 60" lycra which I draped around Betty (my dress form), sewed up a tube with a generous six inches of ease and then I wrapped a halved  60"L x 16"W length of fabric around Betty's bust, sewed up two side seams, added a casing with elastic, eased the skirt to fit the top and popped it over my head. I was done in less than three hours for less than $20! I felt like I'd just completed a quick Project Runway challenge. LOL

This dress can also be worn as a longer-length skirt, so I'm looking forward to mixing and matching with my vast assortment of cardis and tanks. The overall pattern covers a myriad of figure flaws and it packs down to practically nothing for travel. It's a keeper!


This is the second of the five dresses I whipped up this month. I'd forgotten that I'd already showed you one during Me-Made-June. This is my favourite dress of them all.

I wore this to a party last night, and a girlfriend who's style I adore wants one for herself! What a great compliment! It's been over eight months since I sewed for someone else (it's against my selfish sewist nature) but I'm going to buy the fabric today. I'm pretty sure this will add up to positive karma points offsetting my future shennanigans. Plus, she's going to look gorgeous! A win/win in my book.

Tuesday, April 12, 2011

Another CAbi-Inspired Garment: The Paley Vest

CAbi FW 2010 Paley Vest
How cute is that little vest!? I just fell in love with its' graphic nature and the exposed zipper...it's a fun piece to add some spark to the wardrobe. Since it's still fairly cold here in the Pacific Northwest, I'll still be able to get some wear out of it before Spring FINALLY shows up and stays for awhile. We've been getting periodic sunshiny days, but most are still cold! Like 40s to mid 50s. Brrr!

Anywho... on to the vest! I got a screamin' deal on the fabric at Fabric Depot's Outdoor Sale two years ago. I think this wool/poly blend was something like $5 a yard. I made a winter coat out of it, too, and had about 2 yards left to play with. I made my own pattern, based on my Chanel jacket, which had princess seams. Not wanting to match up the houndstooth on princess seams because it's impossible, I joined the front and side front pieces at the seam allowance with pins and traced the joined pieces. I did the same thing for the back piece. When trying this on Betty (my dressform), I realized that I needed .5" bust darts added to the front. They're barely noticeable and make the front hang so much better. I also drafted the front and neck facings based on the pattern I created. I'm pretty pleased with the results. The fringe was fun and MUCH faster to make than on the Chanel jacket.

In the spirit of what I learned from MeMadeMarch '11, most garments I create from now on will go with at least three things I already own. So here goes! I skipped my favourite black pencil skirt/boot combination, because, well... it's boring. Also, it's supposed to be SPRING! Boots are for WINTER. Hear that Spring? I'm calling you OUT.

Houndstooth and pink paisley were made for each other, don'tcha think?
The back looks like I need a swayback adjustment, but IRL, it hangs fine. I must have been standing funny. In related news, after taking this pic, I realized that I have a flat butt. Must learn how to make flat butt adjustments for future trousers. These ones are doing my pert, cute butt NO favours. There may be colourful pants in my future. Wouldn't this look fantastic with RED pants?

I just love black and white houndstooth. I'm now the proud owner of black and white houndstooth Wellies, a purse, a skirt and now a vest. I'm flirting with the idea of wearing the larger format vest with the smaller format skirt. Is that too much? :)

With my red tunic top. Cute!

The long-sleeved white shirt I've been told is a wardrobe essential, but I have never worn. It looks good here!
With a dark denim shirt and jaunty scarf.

Casual with jeans and my pink swirl top. 

Monday, October 4, 2010

V8580 CAbi Erte Tunic Knockoff


I've always loved CAbi's clothes. So easy, so elegant, so DAMNED expensive. (Take a look here). When I first saw this season's collection, I was immediately smitten with the Erte Tunic. The fabric was beautiful, much like Erte's 1920 Art Deco designs. I've been a fan of Erte's since 1988 when I first saw his work in a gallery in San Francisco.

I sweated out this purchase, alternately 1) chiding myself for BUYING something when I know I can make it and 2) moaning, "but I looooove it!!". Trouble is, I don't looove it $128 worth and when I tried it on, it hung nearly to my knees. Not attractive.

So I set about making my own. Luckily, the Vogue 8580 was closer than anything else I could find on the market. With a couple of design changes, I think it turned out beautifully. Armed with a 40% off coupon and a pattern sale ($4), I spent a grand total of $22 on this project. Not bad. Not bad at all.

================================================

Pattern Description: Pullover tunic A, B, C in two lengths have kimono sleeves, self-faced elastic casing with flat front and A-line lower section. A, B: short sleeve with self-cuffs. C: three-quarter length sleeves. Pullover top D is semi-fitted with stitched hems.

I made a straight medium (MEDIUM, people! HURRAY!) of View C with modifications.

Pattern Sizing: Y(XS-S-M), ZZ(L-XL-XXL)

Did it look like the photo/drawing on the pattern envelope once you were done sewing with it?Somewhat. My inspiration for this tunic was the CAbi Erte Tunic from the FW CAbi collection.


Were the instructions easy to follow? I might have glanced at them once. Maybe.

What did you particularly like or dislike about the pattern? It went together in about 2 hours. Nothing like an instant gratification project!

Fabric Used: 100% Polyester from JoAnn's.

Pattern alterations or any design changes you made: This tunic runs voluminously LARGE and runs LONG, ladies. Check out the flat pattern measurements before you cut. I only made a high round back adjustment and removed 2" from the hem. Simple! I hate elastic, so I also added a channel through the middle of the casing pieces, added two buttonholes to the CF and included a waist tie. 

The pattern of the fabric is really busy, so you don't see these design changes in the photo. In hindsight, I'll be removing a couple of inches from the side seams next go 'round. I also hate hemming, so used the roll hem on my serger for the neckline, sleeves and hem.

Would you sew it again? Would you recommend it to others? Heck yeah I'm making it again! I just got back from Italy with TONS of new fabric and have one Gianni Versace silk black and white bitmapped flower fabric I'll be using this pattern for.

Conclusion: This is as close as you can get to wearing elegant jammies at work. I highly recommend this easy pattern for a sewing quick fix!