Monday, July 30, 2012

S2692 || ZigZagZoom Dress


Ever see a fabric from across a crowded room that makes your heart skip a beat, your palms sweat and your breathing race? Maybe it’s just me? I spied this ziggy fabric at the Puyallup Sewing Expo in March and just KNEW I had to have it. Like many of my stash fabrics, I had no idea what to do with it, and so it sat, uncut in my stash for four months while I pondered. And pondered. And pondered.

And then this pattern caught my eye, and I knew it was “the one”. Le sigh.

S2692 Pattern Description: Misses Special Occasion Dress or Gown. Can be sewn up in either knits or special occasion wovens like silks, charmeuse, crepe de chine and georgette. (How’s THAT for versatile?)

Pattern Sizing: 4-12, 12-20. Mine is a 14 in the bust, and a 16 in the hips.

Did it look like the photo/drawing on the pattern envelope once you were done sewing with it? Yes!

Were the instructions easy to follow? Really, really easy. Lots of great line drawings and super clear instructions. This would be a great beginning sewer’s dress, especially if sewn in a knit.

What did you particularly like or dislike about the pattern? Cutting it out took the longest time, but sewing it up was really quick. Initially, I used the zigzag fabric for the center, empire waist section, but after assembly, realized that it would look infinitely better in another colour. Luckily, I had some brown jersey scraps in my stash and ripping it/replacing was quick.

Fabric Used: ITY knit from Vogue Fabrics. It doesn’t roll! It doesn’t roll!

Pattern alterations or any design changes you made: I’m on a “I’m not hemming it unless I have to” kick, so I didn’t hem this dress. I also skipped the zipper insertion as the dress pulls on easily over my head. Instead of placing all of the gathers at CF and CB, I distributed them evenly across both skirt pieces. I like this look much better.

Would you sew it again? Would you recommend it to others? Absolutely, I’d sew it again. Maybe next time in a special occasion fabric?

Conclusion: It's a great little dress with lots of zany zip! I’d absolutely sew it up if you’re looking for a way to use your novelty knit!

Wednesday, July 25, 2012

S1920 || Cascade Cardigan

I first spied this cardigan at the Simplicity style show at the Puyallup Sewing Expo in March. It's the first swing cardi I've seen that has both bust darts and shape paired with the "swingy-ness" you want in this sort of cardigan. A total win!
 
S1920 Pattern Description: Misses' & Plus Size skirt, top, jacket, scarf and belt sewing pattern. Sew Stylish Collection. American Sewing Guild. 

Pattern Sizing: 10-18, 20W-28W. Mine is a 14 in the bust, and a 16 in the waist/hips.

Did it look like the photo/drawing on the pattern envelope once you were done sewing with it? Yes!

Were the instructions easy to follow? Incredibly easy. Coupled with fact I didn't hem anything, it went together really quickly!

What did you particularly like or dislike about the pattern? It came together quickly -- the cutting took the longest since it's a fiddly fabric with lots of holes. I had to use a shorter stitch length to accommodate for the fabric.

Fabric Used: Holey polyester knit from JoAnn's clearance racks. I think the overall project was about $12 including the pattern.

Pattern alterations or any design changes you made: I didn't hem a darn thing. I am a rebel in this way. :) Also, after a couple of wearings, the droopy sleeves really started getting on my nerves. I purchased some Sulky water soluble stabilizer and cuffed up the sleeves. I also removed the sleeve carriers and buttons. I like this better for the fabric I have.


Would you sew it again? Would you recommend it to others? I would make this again, but I'll use a more stable knit next time. I'd recommend it.
 
Conclusion:
It's an attractive cardigan with shape that goes with a remarkable amount of items in my wardrobe! If you want a quick project (which I seem to be addicted to) this is a great pattern!

Friday, July 20, 2012

What to do with old jeans? Make a quilt!

What to do with old jeans and a ratty blanket? Make a picnic quilt!
One of my favourite memories of Fourth of Julys past include spending time in our family friends, the Willcuts', back yard eating homemade vanilla ice cream and lazing the day away on Grandma Willcuts' jean quilt, lovingly made at least 20 years prior. I remember hiding my not-quite-totally-used napkins in the pockets scattered throughout the quilt, while making sure I didn't sit on a jean rivet because they got amazingly HOT in the summer sunshine. This jean blanket went to the lake so we could lay on our backs while watching the fireworks light up the sky. More than once, I found myself wrapped up in it, papoose-style for the chilly post-fireworks walk home. I loved that blanket. It meant home and family and togetherness, mixed with a dash of ingenuity.

Fast-forward to last summer, when Matt and I pignicked on his yellow and white picnic blanket. I knew we could do better. Soon after, I started stockpiling jeans. A few from my dad, one special pair from his (deceased) dad, a pair of his (that ratty pocket in the picture above is his), a few pair of mine, and a couple of plus-sized pairs from a charity shop. They were quite the assortment: blacks and blues and greys. 

I kept the back pockets in tact and cut out 7" squares. From the "plain" squares, I cut triangles and started piecing the quilt together in random couplings. My serger was used for the entire project.

Sun-dappled and ready for pignicking! The top pocket was Matt's dad's.
The light blue pocket is Matt's and the dark blue with wooden button is mine.
The quilt in its entirety.
I really like how it turned out. Rushing only a little, it was ready for its unveiling THIS Fourth of July at my annual Croquet 'n Potluck celebration with friends. Both Matt and I love it, and look forward to using it in the years to come as we make our own happy celebratory memories.
Matt, on his new jean quilt.


Tuesday, March 27, 2012

Sewaholic Patterns || Minoru Jacket

Fun in black and white!
Winter is gross! It's time to make a spring raincoat!


Minoru Pattern Description:
The Minoru Jacket is a zip-front weekend jacket with a secret hood hidden inside the wide collar! If you prefer, skip the hood and let the dramatic collar be the focus. Flattering raglan sleeves are comfortable and easy-to-sew, and the elastic waistline creates a slim, curve-hugging silhouette.

Pattern Sizing:
0-16 (all sizes are included in one pattern!) Mine is a 14.

So versatile and stylish! Fun!
Did it look like the photo/drawing on the pattern envelope once you were done sewing with it? It does! My fabric is a little crazy, tho, so you don't see all of the fabulous details that Tasia included in this pattern. It fits like a dream with enough room inside for a sweater if it gets cold.

Were the instructions easy to follow? The written pattern directions were vetted by eleventy-hundred pattern testers before publication, so if you can read, you can do this! Tasia also provided a sew-a-long (which I participated in), and I felt that even though it took more time, I got a lot of great tips that I'll be using again!

What did you particularly like or dislike about the pattern? I love the hidden hood inside the collar. The inside pockets and nipped waist make this a favourite pattern. I've got a smallish head, tho, so next time I'll draft the hood a little smaller.

Fabric Used: I'm stashbustin' again. This 100% cotton home dec fabric is from Ikea that I've been holding onto it for more than two years. I'm glad I finally used it but its heaviness made gathering the neckline a real PITA.
I also used Scotchguard to weatherize it. The inside is a peacock-coloured static-free acetate lining. 

Pattern alterations or any design changes you made: No pattern alterations (a rare treat!), but I added hidden side-seam pockets (a first!). Next time, I'll use this tutorial and add front pockets. I just can't get enough pockets! I'll also use a different zipper. This one was marked for a parka and has a little joiner at the bottom that makes it a little fiddly to zip up.


Would you sew it again? Would you recommend it to others? I absolutely will make this pattern again. I'm seeing a red jacket in my future...

Conclusion: I love this coat. LOVE it! It was worth all the time and effort I put into it! Thank you, Tasia!

Friday, March 23, 2012

V8151 || CAbi Wrap Top Knockoff

Spring/Summer 2012 CAbi Abstract Wide V-Tee, $69.
Who doesn't adore a good wrap top? CAbi has been throwing this cute top into the mix for the past five years in some form or another. I've always loved this style of top, so it was time to make my own... just in time for St. Patrick's Day!


V8151 Pattern Description: Pullover tops with set in sleeves. Wrapped front, band, shirred sides and long sleeves.

Pattern Sizing: A-J. Mine is a C with modifications (below). 

 
It's totally easy being green!
Did it look like the photo/drawing on the pattern envelope once you were done sewing with it? It does! Although, after seeing this picture, I may take in the sides even further. Since I'm an addict, I want even more rusching!

Were the instructions easy to follow? Sandra Betzina directions are always easy to read and follow. Love her!

What did you particularly like or dislike about the pattern? It's really easy and quick to make. After adding 1" to the neckline, it's STILL lower than I'm comfortable with, so I'll have to either wear a tank under this or grab my trusty safety pin. I'll fix that next time.

Fabric Used: Something new! I've been searching for a good kelly green fabric since I made this top awhile ago. I found this tissue-weight silk and lycra jersey at the Sewing Expo in Puyallup this year. 


Pattern alterations or any design changes you made: I removed .5" from the shoulder, added .5" high round back, 1.5" to the sleeve length, 2" to the front and back length and opted out on the bust darts in favour of gathering that section instead. I'll def. do that again. Bust darts in shifty fabric are tricky! Next time, I'll add an additional 2" to the hem. I like my tops a little longer.


Would you sew it again? Would you recommend it to others? Yes I would! I'd love one in every colour of the rainbow.

Conclusion: This is a great, versatile style that is sure to be in heavy rotation. LOVE it!

Wednesday, March 21, 2012

Basic Cable Hat (from "Stitch and Bitch Nation")

Did you know I can knit? 

I started knitting back in early 2002 and made a boatload of scarves, a couple of wraps, a beer cozy, an ill-fated sweater (frogged!) and an unfinished pair of socks and then promptly quit knitting. I think it was the socks that ended my knitting career at the time. You can only take stabbing yourself under the fingernails with 00 sized bamboo double-pointed needles so many times before laying the sticks down. Plus, knitting was KILLING my wrists. The English method (throwing) that they teach here in the US is horrible for folks who work at any sort of desk job as it employs bending your wrists constantly. The fear of carpal tunnel was too great for me. I knew that there had to be a better way, but I was sideswiped by the desire to learn to sew clothes for myself in 2004 and set my sticks aside for the love of a good machine (and another expensive hobby!).

Fast-forward to 2008 and knitting entered my life again. This time, instead of taking a class, I decided to teach myself the Continental (picking) method. Boy, was I awful at it! My scarves were all loopy sorts of messes, but I got good enough to knit another ill-fated sweater (Frogged again! Will I ever learn?) and set the sticks aside yet again.

Like any other hobby, knitting called my name again this year, when I decided that I needed to learn cabling while watching all sorts of terrible TV during our sloggishly cold and wet winter. Plus, I've got this super hot guy in my life now who likes to wear hats. What better incentive does a girl need? With sticks in hand, I found a good pattern from this book, some delicious yarn to work with (in Mermaid), and set to making my fella a hat!

Isn't he handsome? That's my guy!
Get a load of those cables!
I enjoyed cabling so much, I'm currently making a pair of arm warmers. I hear spring is around the corner in my neck of the Pacific Northwest, but I'll probably be wearing them until July (sigh).

Wednesday, February 8, 2012

M6078 || Sparkle Tank

Every year, for the past nine years, I've held a wine party at my house in mid-January. After the post-holiday slump, it's nice to have an event to look forward to! I invite my friends to bring a bottle of their choice because 1) They really like it, 2) They've never drank it and want to, or 3) They just really liked the look of the label on the shelf. (#3 is the reason I usually pick a wine, FYI) 

The party is also an excuse for me to buy copious amount of cheese to go with the assorted wines, which is really fun for me. I try to mix it up and include some brie, goat, sharp, and the disgustingly wonderful port wine chedder spread from Wisconsin. I'm pretty sure I'm the only one that eats it, but I love it! Post-party, most of the cheesy leftovers get thrown into a big pot of homemade mac and cheese. This year, my fella and his daughter were the lucky invitees to that meal, and although sad to see it go, I sent them home with the leftovers.


Each year, I also try to either make or buy something new to wear to the party. This year, I decided to raid ye olde stash and make a tank. M6078, view B was not my first choice (it was actually my fourth!), but because the original plan for the wee 1-1/2 yard chunk of fabric was a tube top (what WAS I thinking?), my choices were limited.

This pattern has been reviewed a TON on PatternReview.com, so I won't tell you anything you don't already know about it. In fact, this pattern was chosen as one of the Best of 2011 and after the ease with which it went together, I can see why. Just make it. You'll be glad you did!

It may be a little sheer in the back, but I still think it's festive!


Thursday, January 12, 2012

V8778 || Scrap-Happy Sweater

Fun with wool and cashmere
Last January, I got really excited about making new sweaters with project scrap remnants and sweaters that I picked up on the cheap at Goodwill (charity shop). While cleaning out my fabric stash (since it IS January again!), I was ready to part with even more scraps and sweaters... enter sweater V8778.

It's like wearing a hug!
Pattern Description: Very loose-fitting, pullover top or unlined jacket has collar, front and back extending into upper sleeves, lower sleeves and stitched hems. Topstitching.

Pattern Sizing: S – XXL

Did it look like the photo/drawing on the pattern envelope once you were done sewing with it? You bet!

Were the instructions easy to follow? They are, although I put the sleeves in flat and did most of my sewing on the serger.

What did you particularly like or dislike about the pattern? It runs REALLY large. According to pattern sizing, I should have made a large, but after doing some flat pattern measuring, I would have been SWIMMING in that size. Mine is a small in the bust, moving to a medium in the waist/hips.

Fabric Used: Wool and cashmere sweaters and scraps from my stash. The pattern recommends fleece and sweatshirt material, but the hacked up sweaters worked out great!


Pieced under collar (on the right)
Pattern alterations or any design changes you made: I had to strategically carve up the pattern so that I could use my scraps. Each time I cut a section from the pattern, I had to also add extra seam allowances so that everything would line up. The layout of the project took MUCH longer than the sewing, but the finished product is so cool, I wouldn't change a thing.

Would you sew it again? Would you recommend it to others? I might make the zipped version in the future. I've got some red cashmere still in the stash...

Conclusion: This is a warm and cozy sweater that I'm sure I'll be wearing for years. I met Katherine Tilton (and her very inspiring sister, Marci!) at last years' Sewing Expo in Puyallup, WA. I'm considering wearing this sweater to show Katherine at this years' expo. :) Fun!

Monday, January 9, 2012

M6450 || Houndstooth Newsboy Hat

Fun with scraps!
I'm working at stashbusting, and had a couple of different houndstooth fabrics on-hand. On a whim, I picked up M6450 at a $1 pattern sale and decided to play!

This is a fun hat to wear!
 
Pattern Description: Lined hats in head sizes X-Small (20 1/2"), Small (21 1/2"), Medium (22 1/2") and Large (23 1/2") Hat B: Contrast crown, band, belt and buttons to cover.  Designed for medium-weight woven fabrics.

Pattern Sizing: XS - L. Mine was a Medium.

Did it look like the photo/drawing on the pattern envelope once you were done sewing with it? Yes, it did!

Were the instructions easy to follow? Super easy. I'd never made a hat before, and this was quick and made up in less than a day.

What did you particularly like or dislike about the pattern? I used up some stashin' scraps. It doesn't take much fabric to make a hat, I've found. 
Side view
Top view (the center button is a little misplaced, but no one else will notice!)

Fabric Used: 100% wool houndstooth fabric. The large format is a boucle, which was challenging to work with (it shreds when cut). The small format was from the Pendleton store.

Pattern alterations or any design changes you made: I didn't have any fusible hair canvas in the stash and used PalmerPletsch Tailor-weight fusible. Were I to make the hat again, I'd def. get my hands on the hair canvas. The hat collapses really easily under the weight of the heavier fabric.


Since I used the large-format (shredding!) fabric for the band, I couldn't stitch it up as the directions ask you to. Instead, I did my best to tuck under the unruly ends, sandwiching them between the layers. It wasn't a perfect solution, but with the addition of a little strategic Fray Check, those darn unruly ends won't continue to shred. 

I also attached the lining to the crown with a couple of invisible stitches so it wouldn't collapse every time I took the hat off.

I didn't buy a button cover kit for this project, and instead covered a stray stash button using this tutorial. I highly recommend it!

Would you sew it again? Would you recommend it to others?  I would definitely make this hat again. It was quick and easy and it's CUTE on top of it. I'm considering using more scraps by making the gloves in the pattern kit.

Conclusion: This is a fun hat that I get tons of compliments on when I wear it out. If you like a stylish topper, I highly recommend it!

Friday, December 16, 2011

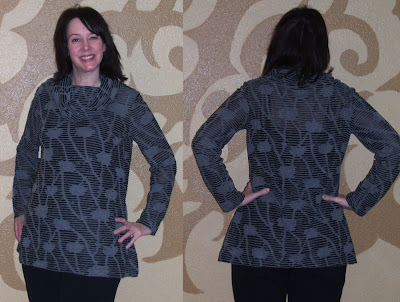
V1261 || Slashed Tunic (CAbi Cozy Tunic Knockoff)

$98 for this adorable tunic? I don't think so!
I've been lusting after the CAbi Cozy Tunic since I first spied it in fall of 2009. Time to make my own!


V1261 Pattern Description: Close fitting. Double needle stitching. A,B: Armhole seams on outside; self binding; ribbon on back; unfinished edges will show. C: neck binding. 

Pattern Sizing: XS-XL. Mine is View B, Large. 

Did it look like the photo/drawing on the pattern envelope once you were done sewing with it? Somewhat. It looks more like my CAbi Cozy Tunic inspiration.

Were the instructions easy to follow? After reading other reviews on Pattern Review, I knew to toss out the instructions and do it myself. Seriously, they're crap. If you've made a top before, the construction is not complicated.

What did you particularly like or dislike about the pattern? It came together quickly once I tossed out the overly-complicated instructions.

Fabric Used: Slashed sweater knit from Marcy Tilton. This was, hands down, the most expensive fabric I purchased in 2011. I'm glad I used it. Her fabrics are amazing.

Pattern alterations or any design changes you made: I added 3" to the sleeve length, 4" to the tunic body, straightened the hem, doubled the cowl (I like a full "cowly" cowl), cut the back piece on the fold and used a 1/4" serged seam allowance. 


Mmmmmm, cozy!
Would you sew it again? Would you recommend it to others? I've got quite a few cowl necks in my wardrobe, but this is a good pattern, if you toss out the crummy instructions.

Conclusion: I love this tunic!