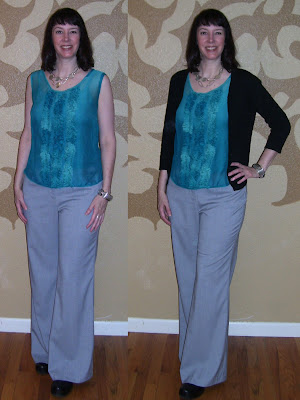
Wednesday, December 14, 2011

M6241 || Mod '80s Batwing Top

Dotty! I'm dotty!
M6241 Pattern Description: Pullover tunics A, B, C have extended shoulders with pleats at one shoulder and side, machine-stitched hems and asymmetrical lower edge; tunic A has cap sleeves; tunics B, C have long sleeves. Mine is View B.

Pattern Sizing: 8-16, 18W-24W. Mine started out as a 14. Probably should have started with a 12.

Did it look like the photo/drawing on the pattern envelope once you were done sewing with it? Somewhat... more on that below.

Were the instructions easy to follow? Super easy. Super fast. This was practically instant gratification.

What did you particularly like or dislike about the pattern? It's an 80's batwing style, which I like, but cut as is, it hangs like a shapeless sack. Yuck. I had to change that (below).

Fabric Used: Poly/lycra, dotted 2-way stretch from fabric.com. You might recognize the fabric as the same I used here.

Pattern alterations or any design changes you made: This top is shapeless, once it's on. I removed 4" total inches (2" each side) from hem to armpit, 2" from armpit to wrist. I like the rusching effect it now has. Unfortunately, the cool tucks in both shoulder and waist are lost on this pattern, but I don't mind. too much.

Would you sew it again? Would you recommend it to others? This is a cute and comfy top to wear. I'd like to make it in kelly green for St. Patrick's day in March.

Conclusion: It's a cute, quick top! Great for stashbustin'!

Monday, December 12, 2011

New Couch Pillows for That Guy I Like

Interior dec sewing ain't so bad!
It's not at all like me to sew for others as I tend to channel this gal most of the time. But my fella? He's TOTALLY worth it. Before me, he had two sad couch pillows that had seen better days that resided on a sectional the size of Manhattan. After I mentioned that he might want to, er, upgrade, he accompanied me to the fabric store without complaint (the gargantuan and potentially overwhelming Fabric Depot), picked out the different home dec fabrics with me, and said he'd even go back to the fabric store again if I ever wanted to. What a guy!


I've never made pillows before, but I decided that it couldn't be too hard. After seeing how expensive pillow forms can be ($20 apiece. Are you KIDDING me?), I made my own! I used hand-me-down tablecloths for the outer shell, and stuffed each of the pillows with a combination of pieces of a lofty, overly-warm comforter that I'd been considering donating to Goodwill and a big 'ol bag of batting from JoAnn's. 

For the fashion fabric outsides, I combined fabrics in a patchwork sort of way for the pillow fronts (no planning on my part, just playing) and used solid fashion fabric for the backs. I also included invisible zippers for closures so that when they get dirty, they can be cleaned easily. Here are the results!

Playing with fabrics is fun!

Helllllo, giant couch! Great for relaxing and watching movies with That Guy I Like.
My fella really likes the new couch pillows, and his sweet daughter, E, said that "They make the couch 100% more comfortable." With rave reviews like that, I may sew for others more often...

Thursday, December 8, 2011

M6408 || Indispensible Tied Cardi

Hello! Sorry I've been so long away from Bloggerville. Rest assured, I'm still sewing (and knitting and cooking), but I've been terribly lax about taking pictures and posting. So get ready for a few posts over the course of the next week or so. I've got some catching up to do.

Who couldn't use more sparkle this time of year?

M6408 Pattern Description: Very loose fitting jackets have stitched or serged seam and hem options. Included are Nancy Zieman's time saving tips.

Pattern Sizing: Mine is a small, View B. This pattern runs SUPER large. For Big 4 patterns, I usually wear a 14 in tops.

Did it look like the photo/drawing on the pattern envelope once you were done sewing with it? It did!

Were the instructions easy to follow? This was my first Nancy Zieman pattern. She's really excellent about telling you how long each step will take, so if you're sewing in fits and starts, this gives you a good idea how your time will be budgeted.

What did you particularly like or dislike about the pattern? I love this pattern! I like the fact that I can wear the tie in either the front or the back, with minor construction changes (more on this below).

Fabric Used: Poly/lycra eyelash sweaterknit. It was a clearance fabric that turned this into a $6 sweater after all the discounts at JoAnn's.

Pattern alterations or any design changes you made: As mentioned above, this pattern has a LOT of ease and runs really large. I added 1/2" high round back adjustment and shaved 1/2" off of the shoulder. Since I didn't want to see the sewn seam on the front band (piece 4) when I wore the ties in the back, I made a slight construction change. Instead of serging both front band seams to the body of the garment at the same time, I serged one seam, turned the other seam's seam allowance to the inside and topstitched the seam down. It made for a cleaner finish.

Would you sew it again? Would you recommend it to others? This is a fantastic little cardigan that I've worn at least five times since I made it in October (gasp!) Although the pattern calls for stretch fabrics only, I also made it up in black doubleknit (not photographed because black is SO hard to photograph well!). The pattern has enough ease on me to still look polished.

Conclusion: I'm going to get a ton of wear out of this cardi before its life span is over. I highly recommend this as a versatile,
indispensible addition to your wardrobe. It sure has been in mine!

Friday, October 28, 2011

S3503 || It's A Mod, Mod, Mod, Mod Fall Dress

These boots were made for walkin'...
It's fall in the PNW, and a great time to start making kicky dresses that go with my favourite fall footwear...boots! This dress is both supercomfortable (once I get it on) and superstylish. A double win, in my book!
 
S3503 Pattern Description: Misses' knit dress in two lengths with bodice variations. Mine is View F.

Pattern Sizing: 14-22. I cut a size 14 bodice and 16 skirt. 

Did it look like the photo/drawing on the pattern envelope once you were done sewing with it? It did!

Were the instructions easy to follow? They were clear and concise. This is a dead easy project that went together really quickly.

What did you particularly like or dislike about the pattern? I'm BIG fan of this pattern, and love how the midriff falls at the narrowest part of my waist.

Fabric Used: Poly/lycra, dotted 2-way stretch with a border print from fabric.com.

Pattern alterations or any design changes you made: I did a 1/2" FBA and added 1" width to the bodice front and back. The fabric was the true challenge here, as the stretch goes in a direction that would have made the dots appear as horizontal lines across my body (adding weight visually). I added 1" to each side seam to accommodate the lack of horizontal stretch, cut off the borders to reattach them to the sleeve edges and hem, and used a not-so-stretchy Lycra black fabric from my stash for the neckline and midriff. I also spaced the gathers along the length of the front and back (vs. gathering them in the middle like the pattern asks you to). Due to the close fit, it's a little bit of a struggle to get the dress on and off, but it's figure-flattering, so worth the trouble.

Would you sew it again? Would you recommend it to others? This is the fourth time I've used this pattern. I definitely recommend it!

Conclusion: This dress is fantastic!
I have to say that S3503 is turning out to be a TNT for me. I've made view D, C, E and now F. It's a great pattern with lots of versatility!

Tuesday, September 20, 2011

Pimpin' My Ride || DIY panniers

I'm upping my street cred. 
I've wanted a bike for nearly as long as I've lived in Portland, OR. This is probably the most bike-friendly city in the United States, and I wanted to be part of the bike culture. With gas prices on the rise (again) and the built-in benefit of great exercise, it's a win-win to go by bike. 

About two months ago, my darling boyfriend bought a new bike for himself, and sweetly gave me his old commuter bike. I've been taking it out on longer and longer rides ("Getting my bike butt", he tells me) and I wanted to go beyond casual rides to start doing actual errands with it. Trouble is, I didn't have panniers (aka: bike bags) and I didn't want to shell out the cash when I could make 'em myself.

It rains here A LOT, so I needed something that would shed water and clean up easily. In my art supply stash, I had three castoff large vinyl advertising banners that would work perfectly for the project. I used this tutorial to make the bags, utilized a Teflon foot, Gutterman thread and a universal needle for the sewing. Knowing that the panniers would probably get both dirty and wet, I chose not to line them with fabric. After the inaugural ride this last Sunday where they were flapping around like Dumbo's ears, I also added Velcro strips to the bag flaps.

Right side exterior. The banner used for the flap was for a cruise ship giveaway.
Interior of right pannier. I added a pocket to hold my cell phone and wallet.
The bag strap also tucks in nicely. (I was on my way to the library. See my book?)
I love these little bags, and can't wait to go grocery shopping with them. I'm on the move!

I also made bike shorts awhile ago, and while you won't see a picture, I highly recommend Kwik Sew 1727.

Sunday, September 11, 2011

S3503 | The Lido Deck Dress

Ready to go see Isaac for a cold drink on the Lido deck!

Keeping with the Swingin' 70s theme for the summer, I needed a maxi dress for the party I attended last night. It's still 95º here, which is really unheard of in the Pacific Northwest, but I'm not going to complain about it. Our summer took SO stinkin' long to show up and it was totally worth the wait.
 
S3503 Pattern Description: Misses' knit dress in two lengths with bodice variations. Mine is View E.

Pattern Sizing: 14-22. I cut a size 14 bodice and skirt. 

Did it look like the photo/drawing on the pattern envelope once you were done sewing with it? It really did!

Were the instructions easy to follow? They were clear and concise. This is a dead easy project that went together really quickly.

What did you particularly like or dislike about the pattern? Hellllllooooo, cleavage! This is a little more of the ladies than I'm used to showing, but in the end, I really like the cut of the neckline and it shows off my me-made necklace really well, too. The bodice also hits at the narrowest part of my waist, so I feel slimmer wearing it!

Fabric Used: Olive bamboo jersey from fabric.com. It's delicious to wear.

Pattern alterations or any design changes you made: I did a 1/2" FBA and added 1" width to the bodice front and back. After reading others' reviews of this version of the dress, I also shirred the back bodice so that it would fit more snugly, and I like the results a LOT. Instead of sewing in bra cups, I utilized my trusty reusable Beautiful You Adhesive Garment Cups.

Would you sew it again? Would you recommend it to others? This is the second time I've used this pattern, and I'm looking forward to making View F in the future. It's a lovely pattern and were I to make another maxi dress, I'd use this pattern again.

Conclusion: This dress is fantastic! Although it pushed my boundaries for personal comfort, I think it's flattering and comfortable. I could get used to being a little more "boobalicious"! :)

Friday, August 5, 2011

B5491 • Fireworks Dress

"Baby, you're a firework…"
According to the trends, 1970s fashions are still in full swing this summer. I thought I'd do my own Studio 54-inspired Halston dress to wear to my 20-year high school reunion last weekend. I have to say, I felt fantastic in our hot weather (85ºF!) had a great time with new and old friends, and didn't drink TOO much. Perfection!


B5491 Pattern Description: Loose-fitting, flared dresses A, B, below mid-knee or evening length, have lined, gathered v-neck bodice, neck band, front draped midriff and back zipper.

Pattern Sizing: 6-20. I cut a size 12 back bodice, 14 front bodice and 14 skirt. 

Did it look like the photo/drawing on the pattern envelope once you were done sewing with it? It really did!

Were the instructions easy to follow? They were clear and concise. Although I went "off book" with my sewing order and construction order, they'd be great direx for a beginning sewist.

What did you particularly like or dislike about the pattern? I love the sexy front and back cutouts and the strap that holds the top of the dress up. Shoulderblades and cleavage and legs? (Oh my!) That's the makings of a great dress, in my opinion. I also liked the built-in bra cups. I usually wear a longline strapless bra, and it was just too hot for that nonsense. I didn't like that the central empire waist section had a tie in the back. To remedy this,  I cut double for those pieces and added them to the dress, also sewing the tucks by hand. It wasn't difficult at all.

Fabric Used: Swimsuit lycra fashion fabric (after all, I could have ended up in the pool like those fun 1980s movies!) and tricot for full lining.

Pattern alterations or any design changes you made: I did a 1/2" FBA and skipped adding the unnecessary back zipper. I also lined the bodice as directed as well as added a full skirt lining. I didn't want to hem the skirt, so I cut the tricot 2" shorter than the fashion fabric, sewed the hems with right sides together, turned wrong sides to insides and then serged the whole thing together. Sandra Betzina showed this method, and I really like it. The dress had great movement with the full lining, so I'd recommend this method if you're using sheer fabrics.

Would you sew it again? Would you recommend it to others? Unless I made this in a solid colour next summer, I think one is enough for me. I'd highly recommend it, tho. Maggie Chin drafts an excellent pattern, and it came together so easily.

Conclusion: This is a great dress! I felt gorgeous and confident wearing it.

Monday, July 4, 2011

Swingin' 70s Pool Party Dress


CAbi Sigourney Skirt ($98)
 Isn't this the cutest dress for summer? Last weekend, I went to a CAbi end-of-season sale (50-70% off? Yes, please!) and tried it on. The sample was a little....generous(?) in the bust, but after looking at the simple construction, I figured I'd try my hand at making my own.

It took nearly 1-1/2 yards of 60" lycra which I draped around Betty (my dress form), sewed up a tube with a generous six inches of ease and then I wrapped a halved  60"L x 16"W length of fabric around Betty's bust, sewed up two side seams, added a casing with elastic, eased the skirt to fit the top and popped it over my head. I was done in less than three hours for less than $20! I felt like I'd just completed a quick Project Runway challenge. LOL

This dress can also be worn as a longer-length skirt, so I'm looking forward to mixing and matching with my vast assortment of cardis and tanks. The overall pattern covers a myriad of figure flaws and it packs down to practically nothing for travel. It's a keeper!


This is the second of the five dresses I whipped up this month. I'd forgotten that I'd already showed you one during Me-Made-June. This is my favourite dress of them all.

I wore this to a party last night, and a girlfriend who's style I adore wants one for herself! What a great compliment! It's been over eight months since I sewed for someone else (it's against my selfish sewist nature) but I'm going to buy the fabric today. I'm pretty sure this will add up to positive karma points offsetting my future shennanigans. Plus, she's going to look gorgeous! A win/win in my book.

Thursday, June 30, 2011

Week 5 || Me-Made June 2011

Last Week! 
Monday, June 27: Poised and Polished

I made this sweet little top over the weekend out of the remnants of another project. I'm IN LOVE with this fabric! It drapes well, breathes well, and the pattern will be great camouflage if I spill anything on myself (which happens more often than I'd like to admit.) I picked up the topper at a CAbi show this weekend, and I think I'm going to wear it with practically everything in my closet!
  • Top: S4076
  • Necklace: Me-made
  • Topper: CAbi
  • Cuff and Trousers: NY&Co.
Tuesday, June 28: Ruffle Up, Buttercup!

This frilly little tank is just fun to wear! It's got some troubling construction problems and ravels like mad at the seams (which I have to fix every time I wear it), but I was a newer sewer when I made it, and I've learned my lesson about the importance of proper seam finishes. Had to add a cardi because it's raining and muggy today.

  • Tuxedo Tank: NL6356
  • Trousers, Cuff, Necklace and Sweater: NY&Co.
Wednesday, June 29: Cropped Down

Not sure that this was my BEST choice this week...I look a little blockish and I blame the crops. I'm digging this dress-cut-down-to-tunic top, tho, and am pleased with how versatile it is in my wardrobe. I've worn it twice this month! 

Thursday, June 30: Bright Spot

This is probably my favourite outfit choice for the entire month of June. I was hoping for better weather, but decided not to let that stop me from wearing it today. Truth be told, this outfit is pretty similar to what I wear all summer long when the weather gets hot. I really enjoy how an A-line skirt makes my waist look smaller!
  • Red Knot Top: S4076
  • Skirt: Self-drafted
  • Jacket: Thrifted
It's been a fun, but trying month for Me-Made-June. Since the weather hasn't been nice enough, I've missed showing you a few fun dresses and some sassy skirts. I've heard that, as of tomorrow, the weather will be turning warmer, and I couldn't be more pleased. I'll be able to show you my 5 NEW Dresses! I'm pleased with how much sewing I accomplished in June!

    Friday, June 24, 2011

    Week 4 || Me-Made June 2011

    Heading Into the Home Stretch!
     

    Monday, June 20: Third Time's A Charm

    This chic little number is fantastic! I love that it's reversible, that it packs down to practically nothing, and that it's easy to dress up or down. This is the third time I've made this dress, so I really like it! This time, I used Sandra Betzina's method and lined only the skirt so I wouldn't have to hem it. I'll do just about ANYTHING to get out of hemming!
    • LB(rown)D travel dress: M6069
    • Necklace: Made by me (I bled for this little piece of stained glass!)
    • Jean Jacket: Calvin Klein

    Tuesday, June 21: Going In Circles

    It was 83º here today, so I thought I wear a summer dress. I made this knit dress when I started sewing a few years ago. It gets a TON of wear in the warmer months and the circles hide a multitude of sins. What's not to love?

    • Dress: S3503
    • Necklace & Bracelet: Made by me
    • Cardi: Refashioned

    Wednesday, June 22: Solid Gold

    The weather turned warm-ish (hence the wrap), so it's time to rock my gold top! I bought the sky-high wedges and white pants last weekend, and couldn't resist wearing them ASAP. I can't believe I made it through an entire day without getting something on these pants! Last time I wore white pants, they made it two hours before I spilled coffee on them. I thought I was cursed.
    • Top: NL6356
    • Necklace/pants/shoes: NY&Co.
    • Cuff: Made by Me
    • Pashmina: Ebay

    Thursday, June 23: Channeling Chanel

    Cold and rainy again today, so it was a great opportunity to wear my Chanel jacket. It was my greatest sewing achievement this year. I feel like I'm a grown-up when I wear this, since it so fancy!
    • Chanel jacket: V7975
    • Necklace, Pants and Tank Top: NY&Co.
    • Shoes: Thrifted (Patent Crocodile! Yay!)

    Friday, June 24: Red Hot

    This swing cardi is getting a lot of wear these days. The weather is still...variable here in June, so I needed something to keep me warm. I rarely wear this tank, so it was fun to break it out. I really like the red and brown combination!
    • Swing Cardi: M5241
    • Tank: Max Studio (thrifted)
    • Necklace: NY&Co.
    I'm still knitting that sweater I told you about last week. Lots of frogging happening, so it's slower going than I thought it would be. I've also completed a dress or three and a skirt that I'm looking forward to showing you...as soon as the weather gets warm enough to actually wear them! Around these parts, it's often been said that "Summer doesn't start until July 5." I hope that's true. This non-summery weather is starting to get to me. :(