Monday, November 15, 2010

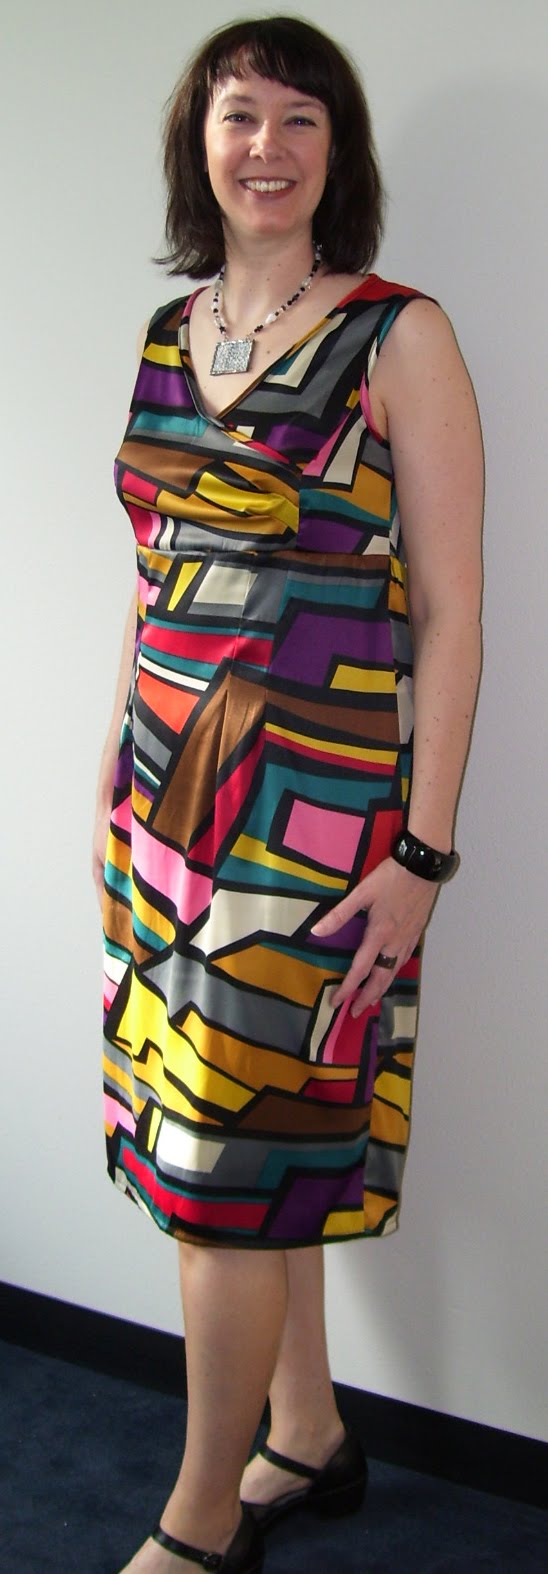
V8634 • Dotty Cowl

Remember this fabric? It's from my Italy haul!

 
Pattern Description: Close-fitting, pullover tops A, B, C, in two lengths, have collar and stitched hems. A: short sleeves. B: three-quarter length sleeves. C: long sleeves. I made view C.

Pattern Sizing: XS – XL. Mine was a straight M. (hooray!)

Did it look like the photo/drawing on the pattern envelope once you were done sewing with it? It did! 

Were the instructions easy to follow? I didn't even look at them. I put the sleeves in flat, but don't know if that differs from the pattern.

What did you particularly like or dislike about the pattern? That seam below the bust is completely unnecessary. I really like how slimming this pattern is.

Fabric Used: Delicious, heavyweight jersey from Bassetti Tessuti! The cowl gets lost in the photo, but it's there.

Pattern alterations or any design changes you made: Like others who have made this, I eliminated the seam below the bust. It doesn't add anything to the design when you're working with such a busy fabric. I added 8" to the cowl length because I like a "meatier" cowl. 

I assembled the entire project on my serger and used 1/4" seams.
 
Would you sew it again? Would you recommend it to others? Yes and YES! I've already made it again, in a forest green jersey. It sews up in under two hours, which is fantastic when you need a sewing quickie. I think this will be a gorgeous use of my peacock alpaca fabric, too.

Conclusion: I can't begin to tell you how much I love this top and this style! Make one already, wont'cha?

Thursday, November 11, 2010

Faux Fur Stole Tutorial


In Italy, faux and real fur clothing and accessories were EVERYWHERE. Fur vests, little boxy fur jackets and fur stoles are on trend for Fall/Winter 2010. Nothing looked terribly difficult to construct, so when I got home, I decided to make a stole for myself. It's SUPER easy, incredibly quick and delightfully chic. Make one for yourself! Here's how:

Supplies:
  • 1/8 – 1/4 yd. faux fur
  • 1/8 – 1/4 yd. lining fabric
  • tracing paper, pen, ruler, scissors
  • razor blade 
  • needle and thread
  • one chopstick

How to:
Step 4
Step 6
  1. Make a paper template that is half the length of your finished stole. Mine was 31"L x 6.5"W. Taper and round off the ends so they're not square. 
  2. Cut out your lining fabric on the fold with this template.
  3. Lay the template on your faux fur with fur side down. Leave enough room on the fabric to "flip" the template horizontally when you're done cutting out half of the stole. Pin template to faux fur.
  4. Using a razor blade (never scissors!), cut out faux fur, slicing only through the backing of the fabric, not the fur.
  5. Flip the template horizontally and complete cutting the faux fur with the razor.
  6. With right sides together, pin the faux fur to the lining, using the chopstick to encourage all the little hairs to stay inside the "burrito". Leave a 6" gap open to pull the fabric through. (see pic, Step 6)
  7. Sew everything but the 6" gap. I used a 5/8" seam allowance.
  8. Pull the right side of the stole thru the gap.
  9. Pull out any hairs that were trapped in the seams with the chopstick.
  10. Sew up the gap, by hand, with a running stitch.
  11. Secure wrap in place with a decorative pin or drape it over yourself like a diva!
Go forth and rock that stole!

Tuesday, November 9, 2010

V8413 • The Joan Dress

Look! It's all the beautiful people – all in one place.
I have a confession to make. I love Mad Men. From the amazing period clothes and furnishings to the clever dialogue and twisty-turny storylines, I look forward to every episode. I love the characters, even when helplessly flawed. And root for them when things get a little rough. (Although I'd love to take on Betty Draper and her pearls in a mudwrestling match! That girl needs to loooosen up! And maybe take a parenting class or twelve…) 


Christina Hendricks as Joan Holloway
Also, when I was snoop shopping in Rome last month, Fendi had a similar dress in a mustard colour ($900…really, Fendi? REALLY?). Around the neck, they'd placed a $800 fur stole. I knew I could rock that look… and I put the whole shebang together (including leopard heels!) for less than $100. This dress alone, I will wear for YEARS. (Look for the fur stole tutorial coming soon!)


+++++++++++++++++++++++++++++++++

Pattern Description: Close-fitting dress have bodice, sleeve and collar variation, straight skirt with front pleats, back darts, zipper and vent. Three-quarter length sleeves, princess seams and one piece collar. Hem hits at mid-knee. (I made View D)

Pattern Sizing: 8-24.
I made 14 bodice and a 16 skirt. My usual combo.

Did it look like the photo/drawing on the pattern envelope 

Vogue 8413
once you were done sewing with it? Yes!

Were the instructions easy to follow? I looked at them once to figure out how to put the cowl and facing together.

What did you particularly like or dislike about the pattern? This was a quick dress to make! The design lines are simple and it's an elegant garment I can dress up or down. My kicky black boots will look great with this, too!

Fabric Used: Polyester double knit, which I'd never sewn with before. It's is a dream, and I'm planning on using it again in dresses and other garments. (See Gertie's link for sewing with doubleknits.)

Pattern alterations or any design changes you made:

1/2" princess FBA, added 1" to bodice length, high round back adjustment. I'm 5'9", so I added 2" to hem of skirt so it would cover my knees.
 
Would you sew it again? Would you recommend it to others? I can see it in red… and purple… The design variations in the pattern give a lot of flexibility.

Conclusion: This dress is amazing. I can dress it up or down and it's comfortable without looking slouchy. I think it'll get a lot of wear this fall and winter!

Thursday, October 14, 2010

Adding to the Stash : Bassetti Tessuti, Rome, Italy

Rooms upon rooms of fabric. Heck yeah!

Have you heard of Bassetti Tessuti? (which is really fun to say!)

Before I'd read the NYT article about them and been to Rome, I hadn't either. In planning my trip to Italy last month, I KNEW I had to stop there. I'd heard it was overwhelming, amazing and so fabulous they gave you a GUIDE, but until I got there, I had NO idea what kind of "Alice in Wonderland" kind of experience I was in for. Floor-to-ceiling fabrics of all sorts. Here, a room full of men's suiting, there, a room full of crisp cotton shirting. 99.9% of it completely unavailable in the US. I was like a kid in a candy store, but oh, what candy!

So, without further ado, let me show you what I bought and what I plan to do with it.


Alpaca wool in teal and purple : Soft enough for some beautiful sweaters!
Anyone got a good sweater pattern?
I'm open to suggestions.

100% silk panel. This will be hemmed into a scarf.

Black and white burnout velvet. I'm thinking of a long-sleeved button up. Cute over a tank top and trousers.

Bitmapped 100% silk fabric from Gianni Versace (!!). Destined to be one of these.

Olive burnout velvet. Will be lined in nude and made into a tank top.

Heavy lycra jersey destined to be cute, long-sleeved tops. Possibly with cowls (my new favourite thing!)

The splurge: sequins! That are black on one side…

And silver on the other. This will be a tube top to be worn under sweaters and jackets.
None of it was cheap – averaging about $30US/yard. It was a PITA to ship (and spendy!), but I don't regret a purchase. Or the fact that my handsome "helper", Marcello, flirted with me mercilessly and begged me to go to lunch with him that day. Who am I to resist? I was furthering US/Italian relations. Just doing my part. Viva Italia!

Monday, October 11, 2010

It's Fall! Time for Bread and Soup!

I love bread. And carbs. And anything bread-adjacent.  Give me a good sized tub of butter and a fresh loaf of warm bread, and I'll make quick work of it. 

That being said, this was my first time actually baking bread, and although it was time-intensive (two rises! Four hours!?), as I hustled through my Saturday, I found that I could do everything I wanted to and STILL make bread. Healthy bread.

Let's just cut to the chase here. It was AMAZING. And also really, really tall. Next time, I'll make two smaller loaves instead of one big one. 

I paired my bread with some delicious Zucchini and Turkey soup from the "Cooking Light: Best Recipes of 2007" book that my friend, Kimo, let me borrow. It's simply the best soup I've had all year. Try it and I bet you'll agree. (recipe below)

Next challenge: sourdough!


OATMEAL SANDWICH BREAD
adapted from “Good to the Grain” by Kim Boyce.

Makes one ginormous loaf or two smaller loaves.

Ingredients

  • 2 cups warm water
  • 2+1/4 tsp active dry yeast
  • 3 tbsp unsulphured (not blackstrap) molasses
  • 2+1/2 cups whole wheat flour
  • 2 cups all-purpose flour
  • 1 cup rolled oats
  • 4 tbsp unsalted butter, melted and cooled slightly
  • 1 tbsp kosher salt
 
  1. Lightly butter a large bowl and a 9x5 inches loaf pan and set aside.
  2. In the bowl of a stand mixer, stir water, yeast and molasses to combine. Allow the yeast to bloom for about 5 minutes, or until it begins to bubble. Add the flours, rolled oats and melted butter. Stir with a wooden spoon to combine, cover with a towel and let stand for 30 minutes.
  3. Add salt to the dough, attach the bread hook to the mixer and mix on medium speed for 6 minutes, until the dough no longer sticks to the sides (add a tablespoon or two of flour if necessary).
  4. For the first rise, scrape the dough onto a lightly floured work surface and knead it a few times. Put the dough into the buttered bowl, cover with a towel, and leave it to rise for about 1 hour, or until it is doubled in size.
  5. Scrape the dough onto a floured work surface. Shape it into a square, then fold it down from the top to the middle and then up from the bottom to the middle (just like you fold a letter). Bring the top and bottom edges together, pinch and seal.
  6. Place the dough in the pan with the seam side down, and press it gently into the corners of the pan. Cover the dough with a towel, and let it rest in a warm place for about 1 hour, or until the dough rises to half again its size.
  7. Preheat the oven to 400°F. Bake for 40 minutes, rotating halfway through. Store in an airtight container for up to 3 days. Freezes well.

TURKEY, CHICKPEA AND ZUCCHINI SOUP
From Cooking Light Annual Recipes 2007, Makes 10 (1 cup) servings.


Ingredients
1 tsp. olive oil
1 c. chopped onions
1-1/2 tsp. minced, fresh rosemary
2 garlic cloves, minced
3 c. chopped zucchini
1/4 tsp. pepper
1/8 tsp. salt
1/2 ground chicken, turkey or tofu
4 c. broth (chicken, veggie)
1/4 c. dry white wine
3 T. tomato paste
1/2 tsp. crushed red pepper (or more for spice)
2 - 15-1/2 oz. cans chickpeas (garbanzo beans), rinsed and drained
2 - 14-1/2 oz. cans diced tomatoes [darcinote: I used one. It was fine]
1 bay leaf
3/4 c. grated Parmesan cheese

  1. Heat oil in Dutch oven over medium heat. Add onion, rosemary and garlic; sautee 2 minutes. Add zucchini, pepper, salt, red pepper and chicken/turkey/tofu; cook 5 minutes or until chicken is browned, stirring to crumble.
  2. Add broth + wine, tomato paste, chickpeas, onions, tomatoes and bay leaf; bring to boil.
  3. Reduce heat and simmer for 30 minutes. Discard bay leaf, sprinkle with cheese.

Monday, October 4, 2010

V8580 CAbi Erte Tunic Knockoff


I've always loved CAbi's clothes. So easy, so elegant, so DAMNED expensive. (Take a look here). When I first saw this season's collection, I was immediately smitten with the Erte Tunic. The fabric was beautiful, much like Erte's 1920 Art Deco designs. I've been a fan of Erte's since 1988 when I first saw his work in a gallery in San Francisco.

I sweated out this purchase, alternately 1) chiding myself for BUYING something when I know I can make it and 2) moaning, "but I looooove it!!". Trouble is, I don't looove it $128 worth and when I tried it on, it hung nearly to my knees. Not attractive.

So I set about making my own. Luckily, the Vogue 8580 was closer than anything else I could find on the market. With a couple of design changes, I think it turned out beautifully. Armed with a 40% off coupon and a pattern sale ($4), I spent a grand total of $22 on this project. Not bad. Not bad at all.

================================================

Pattern Description: Pullover tunic A, B, C in two lengths have kimono sleeves, self-faced elastic casing with flat front and A-line lower section. A, B: short sleeve with self-cuffs. C: three-quarter length sleeves. Pullover top D is semi-fitted with stitched hems.

I made a straight medium (MEDIUM, people! HURRAY!) of View C with modifications.

Pattern Sizing: Y(XS-S-M), ZZ(L-XL-XXL)

Did it look like the photo/drawing on the pattern envelope once you were done sewing with it?Somewhat. My inspiration for this tunic was the CAbi Erte Tunic from the FW CAbi collection.


Were the instructions easy to follow? I might have glanced at them once. Maybe.

What did you particularly like or dislike about the pattern? It went together in about 2 hours. Nothing like an instant gratification project!

Fabric Used: 100% Polyester from JoAnn's.

Pattern alterations or any design changes you made: This tunic runs voluminously LARGE and runs LONG, ladies. Check out the flat pattern measurements before you cut. I only made a high round back adjustment and removed 2" from the hem. Simple! I hate elastic, so I also added a channel through the middle of the casing pieces, added two buttonholes to the CF and included a waist tie. 

The pattern of the fabric is really busy, so you don't see these design changes in the photo. In hindsight, I'll be removing a couple of inches from the side seams next go 'round. I also hate hemming, so used the roll hem on my serger for the neckline, sleeves and hem.

Would you sew it again? Would you recommend it to others? Heck yeah I'm making it again! I just got back from Italy with TONS of new fabric and have one Gianni Versace silk black and white bitmapped flower fabric I'll be using this pattern for.

Conclusion: This is as close as you can get to wearing elegant jammies at work. I highly recommend this easy pattern for a sewing quick fix!

Tuesday, August 24, 2010

The Infinity Dress

My Infinity Dress
Inspired by the amazing Carolyn and her fantastic recent "6 ways" post, I thought I'd share the Infinity Dress with you today. I made it quite awhile ago, and can't seem to stop playing with it! I get loads of compliments when I wear it, and who doesn't love that?

This is an extremely simple and versatile dress, made of only a tube skirt and two very long straps. I also added a tube top with elastic on top and bottom for modesty, since my straps weren't wide enough to avoid the dreaded "side boob". (Boys dig it, I really don't.)


Did I mention how much fun it is to play with?
Check just some of the options (click the links to make 'em larger):

 And some really fabulous ways to style it:

The tutorial that I followed is here

The expensive version that was my inspiration is here

Donna Karan had a version of this dress for Resort 2009 that retailed for $995 and made me REALLY glad that I know how to sew. My version, made from a peacock jersey MAYBE cost $30 at the most and took less than 3 hours to make. How's that for a quick dress?

So, consider making one of your very own! It's the most fun I've had with an article of clothing FOREVER, and I'm trying to figure out how to create other pieces in my wardrobe that put the FUN in functional! Go play!

Wednesday, July 21, 2010

Vogue 8553 • Zingy Summer Dress


 Pattern Description: Fitted (through bodice), cap sleeve dresses
A, B with sash have gathers, front and neck bands, pleated skirt, flared and mid-knee length. A: contrast sash and bands.

Pattern Sizing: AA(6-8-10-12), EE(14-16-18-20) Mine was a 14 bodice and an 18 skirt. I ended up taking 2" off each side before construction was through. I guess I thought I'd need more "give". It really didn't.

Did it look like the photo/drawing on the pattern envelope once you were done sewing with it? It did! (with mods)

Were the instructions easy to follow? They were, but that darn facing was SO fussy! There's really got to be an easier way, folks, but I haven't found it yet.

What did you particularly like or dislike about the pattern? I love that the bodice fit perfectly and the skirt is super-twirly. Just have to make sure not to pull a "Marilyn" when you do twirly-whirlies.

Fabric Used: I searched high and LOW for the perfect fabric for this dress. The search took four months, I kid you not. I LOVE the colour combination and I think it's just zingy!

Pattern alterations or any design changes you made: I added 2-1/4" to the bodice and forgot to add it to the facings initially, so had to re-cut those with the scant fabric I had. In the end, I'd totally forgotten how heavy this would be, and probably didn't need to do the adjustment. I would have rather had the waistline at the highest part of my waist, rather that the lowest.

I really, really HATED the sash that came with the pattern it was fine in the back, but drooped in the front and didn't cover the waistline seam, so I cut it apart and made a circular cummerbund that I pull on over my head. I'm thinking it'll look cute over a tunic top, too, so it's a two-fer! The neckline on me was dangerously low for my comfort, so after construction, I stitched it up an inch.

Can I tell you how much I hate hemming dresses? Thank GOD for my serger, that does a nice rolled hem. Between the lack of hem and drape of the dress, it falls to just the right spot.

Would you sew it again? Would you recommend it to others? I would! It went together really fast (an apparent hallmark of my projects), it's comfortable, and I love twirling in it.

Conclusion: It's a great summer dress that skims over the lumps and bumps. It makes me look thinner, and there's NOTHING wrong with that!

Wednesday, June 30, 2010

Simplicity 2550 • Stained Glass Dress

There's nothing I love more than getting inspired by fabric. Seems like I'm on a 60's – 70's kick these days, and this stained glass fabric was no exception. Like most sewers, I've got *enough* fabric in my stash, but is enough ever ENOUGH, really? (You already know the answer to this…)

I was on my way out of JoAnn's one afternoon (buying supplies/notions, I'm sure) when I saw this darling fabric. I just couldn't leave without it. The pattern was already in my pattern stash, so I whipped this little confection up.

Pattern Description: Misses' dress with bodice variations sewing pattern. Inspired by Project Runway. Mine is sleeveless.

Pattern Sizing: 4–20. Mine is a 12 in the top, 16 on the bottom

Did it look like the photo/drawing on the pattern envelope once you were done sewing with it? Yes!

Were the instructions easy to follow? They were.

What did you particularly like or dislike about the pattern? It's a flattering dress, no matter your size.

Fabric Used: 100% static-lovin' polyester. Quick tip: use a dryer sheet to "wipe down" the inside of your garment and outside of slip to negate static cling.

Pattern alterations or any design changes you made: FBA, High-round back, added extra length to skirt.

Would you sew it again? Would you recommend it to others? I love this dress. I think it's really rockin' the 60s vibe. No worries about matching up prints, either. What's not to love?

Conclusion: I adore this dress. It looks great with a cardi or a jacket over top (for work). Looks swell both in tall boots and summer sandals. It's a keeper!

Tuesday, June 22, 2010

Kwik Sew 3790 • Asymmetrical top

Pattern Description: Close fitting tops have asymmetrical front neckline finished with facings, front shoulder inset with gathers, and gathers on left front. View A has cap sleeves and armholes are finished with self fabric bindings. View B has dropped shoulders and full length sleeves.

Pattern Sizing: XS-S-M-L-XL

Did it look like the photo/drawing on the pattern envelope once you were done sewing with it? Mine's cuter!

Were the instructions easy to follow? Totally easy.

What did you particularly like or dislike about the pattern? Like all Kwik Sew patterns, it was quick! And really easy to sew.

Fabric Used: 100% poly knit from JoAnn's.

Pattern alterations or any design changes you made: Just like "needs more cowbell", I need more rusching! I just can't get enough, so I added additional length to both sides to accommodate it -- maybe 6 extra inches on either side. The armholes are a little high on this one, so I'll be taking .5" off those next time. I'm also planning to lower the neckline a bit. It's a little high to wear anything but a short necklace with. I'd like more flexibility for my vast necklace collection.

Would you sew it again? Would you recommend it to others? I will definitely sew this again. I've already got more fabric in my stash ready for it. I plan to make the long-sleeved version in emerald &/or deep purple this coming fall.

Conclusion: This simple asymmetrical top with rusching is a blast to wear! It's comfortable, flattering and easy to sew. It'll look great with my collection of cute summer skirts! (Thank you, "Sew What Skirts"! > http://www.amazon.com/Sew-What-Skirts-Fabulous-Fabrics/dp/1580176259/ref=sr_1_1?ie=UTF8&s=books&qid=1277219128&sr=8-1