Monday, October 11, 2010

It's Fall! Time for Bread and Soup!

I love bread. And carbs. And anything bread-adjacent.  Give me a good sized tub of butter and a fresh loaf of warm bread, and I'll make quick work of it. 

That being said, this was my first time actually baking bread, and although it was time-intensive (two rises! Four hours!?), as I hustled through my Saturday, I found that I could do everything I wanted to and STILL make bread. Healthy bread.

Let's just cut to the chase here. It was AMAZING. And also really, really tall. Next time, I'll make two smaller loaves instead of one big one. 

I paired my bread with some delicious Zucchini and Turkey soup from the "Cooking Light: Best Recipes of 2007" book that my friend, Kimo, let me borrow. It's simply the best soup I've had all year. Try it and I bet you'll agree. (recipe below)

Next challenge: sourdough!


OATMEAL SANDWICH BREAD
adapted from “Good to the Grain” by Kim Boyce.

Makes one ginormous loaf or two smaller loaves.

Ingredients

  • 2 cups warm water
  • 2+1/4 tsp active dry yeast
  • 3 tbsp unsulphured (not blackstrap) molasses
  • 2+1/2 cups whole wheat flour
  • 2 cups all-purpose flour
  • 1 cup rolled oats
  • 4 tbsp unsalted butter, melted and cooled slightly
  • 1 tbsp kosher salt
 
  1. Lightly butter a large bowl and a 9x5 inches loaf pan and set aside.
  2. In the bowl of a stand mixer, stir water, yeast and molasses to combine. Allow the yeast to bloom for about 5 minutes, or until it begins to bubble. Add the flours, rolled oats and melted butter. Stir with a wooden spoon to combine, cover with a towel and let stand for 30 minutes.
  3. Add salt to the dough, attach the bread hook to the mixer and mix on medium speed for 6 minutes, until the dough no longer sticks to the sides (add a tablespoon or two of flour if necessary).
  4. For the first rise, scrape the dough onto a lightly floured work surface and knead it a few times. Put the dough into the buttered bowl, cover with a towel, and leave it to rise for about 1 hour, or until it is doubled in size.
  5. Scrape the dough onto a floured work surface. Shape it into a square, then fold it down from the top to the middle and then up from the bottom to the middle (just like you fold a letter). Bring the top and bottom edges together, pinch and seal.
  6. Place the dough in the pan with the seam side down, and press it gently into the corners of the pan. Cover the dough with a towel, and let it rest in a warm place for about 1 hour, or until the dough rises to half again its size.
  7. Preheat the oven to 400°F. Bake for 40 minutes, rotating halfway through. Store in an airtight container for up to 3 days. Freezes well.

TURKEY, CHICKPEA AND ZUCCHINI SOUP
From Cooking Light Annual Recipes 2007, Makes 10 (1 cup) servings.


Ingredients
1 tsp. olive oil
1 c. chopped onions
1-1/2 tsp. minced, fresh rosemary
2 garlic cloves, minced
3 c. chopped zucchini
1/4 tsp. pepper
1/8 tsp. salt
1/2 ground chicken, turkey or tofu
4 c. broth (chicken, veggie)
1/4 c. dry white wine
3 T. tomato paste
1/2 tsp. crushed red pepper (or more for spice)
2 - 15-1/2 oz. cans chickpeas (garbanzo beans), rinsed and drained
2 - 14-1/2 oz. cans diced tomatoes [darcinote: I used one. It was fine]
1 bay leaf
3/4 c. grated Parmesan cheese

  1. Heat oil in Dutch oven over medium heat. Add onion, rosemary and garlic; sautee 2 minutes. Add zucchini, pepper, salt, red pepper and chicken/turkey/tofu; cook 5 minutes or until chicken is browned, stirring to crumble.
  2. Add broth + wine, tomato paste, chickpeas, onions, tomatoes and bay leaf; bring to boil.
  3. Reduce heat and simmer for 30 minutes. Discard bay leaf, sprinkle with cheese.

Monday, October 4, 2010

V8580 CAbi Erte Tunic Knockoff


I've always loved CAbi's clothes. So easy, so elegant, so DAMNED expensive. (Take a look here). When I first saw this season's collection, I was immediately smitten with the Erte Tunic. The fabric was beautiful, much like Erte's 1920 Art Deco designs. I've been a fan of Erte's since 1988 when I first saw his work in a gallery in San Francisco.

I sweated out this purchase, alternately 1) chiding myself for BUYING something when I know I can make it and 2) moaning, "but I looooove it!!". Trouble is, I don't looove it $128 worth and when I tried it on, it hung nearly to my knees. Not attractive.

So I set about making my own. Luckily, the Vogue 8580 was closer than anything else I could find on the market. With a couple of design changes, I think it turned out beautifully. Armed with a 40% off coupon and a pattern sale ($4), I spent a grand total of $22 on this project. Not bad. Not bad at all.

================================================

Pattern Description: Pullover tunic A, B, C in two lengths have kimono sleeves, self-faced elastic casing with flat front and A-line lower section. A, B: short sleeve with self-cuffs. C: three-quarter length sleeves. Pullover top D is semi-fitted with stitched hems.

I made a straight medium (MEDIUM, people! HURRAY!) of View C with modifications.

Pattern Sizing: Y(XS-S-M), ZZ(L-XL-XXL)

Did it look like the photo/drawing on the pattern envelope once you were done sewing with it?Somewhat. My inspiration for this tunic was the CAbi Erte Tunic from the FW CAbi collection.


Were the instructions easy to follow? I might have glanced at them once. Maybe.

What did you particularly like or dislike about the pattern? It went together in about 2 hours. Nothing like an instant gratification project!

Fabric Used: 100% Polyester from JoAnn's.

Pattern alterations or any design changes you made: This tunic runs voluminously LARGE and runs LONG, ladies. Check out the flat pattern measurements before you cut. I only made a high round back adjustment and removed 2" from the hem. Simple! I hate elastic, so I also added a channel through the middle of the casing pieces, added two buttonholes to the CF and included a waist tie. 

The pattern of the fabric is really busy, so you don't see these design changes in the photo. In hindsight, I'll be removing a couple of inches from the side seams next go 'round. I also hate hemming, so used the roll hem on my serger for the neckline, sleeves and hem.

Would you sew it again? Would you recommend it to others? Heck yeah I'm making it again! I just got back from Italy with TONS of new fabric and have one Gianni Versace silk black and white bitmapped flower fabric I'll be using this pattern for.

Conclusion: This is as close as you can get to wearing elegant jammies at work. I highly recommend this easy pattern for a sewing quick fix!

Tuesday, August 24, 2010

The Infinity Dress

My Infinity Dress
Inspired by the amazing Carolyn and her fantastic recent "6 ways" post, I thought I'd share the Infinity Dress with you today. I made it quite awhile ago, and can't seem to stop playing with it! I get loads of compliments when I wear it, and who doesn't love that?

This is an extremely simple and versatile dress, made of only a tube skirt and two very long straps. I also added a tube top with elastic on top and bottom for modesty, since my straps weren't wide enough to avoid the dreaded "side boob". (Boys dig it, I really don't.)


Did I mention how much fun it is to play with?
Check just some of the options (click the links to make 'em larger):

 And some really fabulous ways to style it:

The tutorial that I followed is here

The expensive version that was my inspiration is here

Donna Karan had a version of this dress for Resort 2009 that retailed for $995 and made me REALLY glad that I know how to sew. My version, made from a peacock jersey MAYBE cost $30 at the most and took less than 3 hours to make. How's that for a quick dress?

So, consider making one of your very own! It's the most fun I've had with an article of clothing FOREVER, and I'm trying to figure out how to create other pieces in my wardrobe that put the FUN in functional! Go play!

Wednesday, July 21, 2010

Vogue 8553 • Zingy Summer Dress


 Pattern Description: Fitted (through bodice), cap sleeve dresses
A, B with sash have gathers, front and neck bands, pleated skirt, flared and mid-knee length. A: contrast sash and bands.

Pattern Sizing: AA(6-8-10-12), EE(14-16-18-20) Mine was a 14 bodice and an 18 skirt. I ended up taking 2" off each side before construction was through. I guess I thought I'd need more "give". It really didn't.

Did it look like the photo/drawing on the pattern envelope once you were done sewing with it? It did! (with mods)

Were the instructions easy to follow? They were, but that darn facing was SO fussy! There's really got to be an easier way, folks, but I haven't found it yet.

What did you particularly like or dislike about the pattern? I love that the bodice fit perfectly and the skirt is super-twirly. Just have to make sure not to pull a "Marilyn" when you do twirly-whirlies.

Fabric Used: I searched high and LOW for the perfect fabric for this dress. The search took four months, I kid you not. I LOVE the colour combination and I think it's just zingy!

Pattern alterations or any design changes you made: I added 2-1/4" to the bodice and forgot to add it to the facings initially, so had to re-cut those with the scant fabric I had. In the end, I'd totally forgotten how heavy this would be, and probably didn't need to do the adjustment. I would have rather had the waistline at the highest part of my waist, rather that the lowest.

I really, really HATED the sash that came with the pattern it was fine in the back, but drooped in the front and didn't cover the waistline seam, so I cut it apart and made a circular cummerbund that I pull on over my head. I'm thinking it'll look cute over a tunic top, too, so it's a two-fer! The neckline on me was dangerously low for my comfort, so after construction, I stitched it up an inch.

Can I tell you how much I hate hemming dresses? Thank GOD for my serger, that does a nice rolled hem. Between the lack of hem and drape of the dress, it falls to just the right spot.

Would you sew it again? Would you recommend it to others? I would! It went together really fast (an apparent hallmark of my projects), it's comfortable, and I love twirling in it.

Conclusion: It's a great summer dress that skims over the lumps and bumps. It makes me look thinner, and there's NOTHING wrong with that!

Wednesday, June 30, 2010

Simplicity 2550 • Stained Glass Dress

There's nothing I love more than getting inspired by fabric. Seems like I'm on a 60's – 70's kick these days, and this stained glass fabric was no exception. Like most sewers, I've got *enough* fabric in my stash, but is enough ever ENOUGH, really? (You already know the answer to this…)

I was on my way out of JoAnn's one afternoon (buying supplies/notions, I'm sure) when I saw this darling fabric. I just couldn't leave without it. The pattern was already in my pattern stash, so I whipped this little confection up.

Pattern Description: Misses' dress with bodice variations sewing pattern. Inspired by Project Runway. Mine is sleeveless.

Pattern Sizing: 4–20. Mine is a 12 in the top, 16 on the bottom

Did it look like the photo/drawing on the pattern envelope once you were done sewing with it? Yes!

Were the instructions easy to follow? They were.

What did you particularly like or dislike about the pattern? It's a flattering dress, no matter your size.

Fabric Used: 100% static-lovin' polyester. Quick tip: use a dryer sheet to "wipe down" the inside of your garment and outside of slip to negate static cling.

Pattern alterations or any design changes you made: FBA, High-round back, added extra length to skirt.

Would you sew it again? Would you recommend it to others? I love this dress. I think it's really rockin' the 60s vibe. No worries about matching up prints, either. What's not to love?

Conclusion: I adore this dress. It looks great with a cardi or a jacket over top (for work). Looks swell both in tall boots and summer sandals. It's a keeper!

Tuesday, June 22, 2010

Kwik Sew 3790 • Asymmetrical top

Pattern Description: Close fitting tops have asymmetrical front neckline finished with facings, front shoulder inset with gathers, and gathers on left front. View A has cap sleeves and armholes are finished with self fabric bindings. View B has dropped shoulders and full length sleeves.

Pattern Sizing: XS-S-M-L-XL

Did it look like the photo/drawing on the pattern envelope once you were done sewing with it? Mine's cuter!

Were the instructions easy to follow? Totally easy.

What did you particularly like or dislike about the pattern? Like all Kwik Sew patterns, it was quick! And really easy to sew.

Fabric Used: 100% poly knit from JoAnn's.

Pattern alterations or any design changes you made: Just like "needs more cowbell", I need more rusching! I just can't get enough, so I added additional length to both sides to accommodate it -- maybe 6 extra inches on either side. The armholes are a little high on this one, so I'll be taking .5" off those next time. I'm also planning to lower the neckline a bit. It's a little high to wear anything but a short necklace with. I'd like more flexibility for my vast necklace collection.

Would you sew it again? Would you recommend it to others? I will definitely sew this again. I've already got more fabric in my stash ready for it. I plan to make the long-sleeved version in emerald &/or deep purple this coming fall.

Conclusion: This simple asymmetrical top with rusching is a blast to wear! It's comfortable, flattering and easy to sew. It'll look great with my collection of cute summer skirts! (Thank you, "Sew What Skirts"! > http://www.amazon.com/Sew-What-Skirts-Fabulous-Fabrics/dp/1580176259/ref=sr_1_1?ie=UTF8&s=books&qid=1277219128&sr=8-1

Friday, May 28, 2010

Butterick 5386 • Knockoff Sweater

I loooooove catalog shopping. I get great ideas for future sewing projects and get to scoff at the prices because, as a sewer, I know I can make it: 1) cheaper than the listed price, 2) to fit me perfectly, 3) quicker than the catalog company can ship it (when I'm inspired).

This $89 sweater called to me from the pages of a Gap-owned athletic catalog, and I knew I just had to own it. I'd never worked with sweater fabric before. Heck, I never knew they MADE sweater fabric before this project, but I'm here to say, this project was quick, easy and with a few mods, perfect for me.

I'd also never rusched with elastic thread before. With some practice, it was surprisingly easy. I plan to use this technique again in the future as a design detail.

Pattern Description: Multiple options for a fitted top. I made view A that has a V-neckline and long sleeves.

Pattern Sizing: BB (8-10-12-14) I cut a straight 14.

Did it look like the photo/drawing on the pattern envelope once you were done sewing with it? It's definitely in the ballpark. I think a less busy print would highlight the center ruching better.

Were the instructions easy to follow? I don't think I even read them. I inserted the sleeves flat and they went in like a dream.

What did you particularly like or dislike about the pattern? When Butterick says a pattern is Fast & Easy, they really mean it!

Fabric Used: Lightweight, loose weave polyester-lycra blend sweaterknit from JoAnn Fabrics.

Pattern alterations or any design changes you made: This pattern required very few changes.
• 1/2" added for the high round back
• Deepened the V-neckline by 3"
• Added slight bell curve to sleeves, lengthened 1".
• Added 2" to side seams below bust to allow for looser fit and accommodate ruching with elastic thread.
• Skipped the facing and used self-fabric to enclose neck seam.
• Didn't feel like hemming so used roll hem on the serger to finish off sleeves and hem.

Would you sew it again? Would you recommend it to others? I'm going to make it again in a solid sweater fabric. I plan to wear the heck out of it when I travel.

Conclusion:  I love it! You will, too.

Tuesday, May 11, 2010

Spicy Bean Salsa (or Cowboy Caviar)

'Tis the season for pignics and get-togethers! This is a quick, healthy dish that satisfies the masses (and has them begging for the recipe.) It can stand on its own as a side salad, tops grilled chicken with panache and can hold its own on a sturdy tortilla chip. Extra bonus: you make it the day before the event. How's that for stress-free?

  • 1 (15 ounce) can black-eyed peas or pinto beans
  • 1 (15 ounce) can black beans, rinsed and drained
  • 1 package frozen corn, thawed
  • 1/2 cup chopped onion (green, red, white)
  • 1/2 cup chopped red bell pepper
  • 2 jalapeno peppers, diced (optional)
  • 4 roma tomatoes, diced
  • 2 cloves garlic, minced
  • 1/2 c. fresh cilantro, rough chopped
Dressing:
  • 1/4 fresh lime juice (3-4 limes)
  • 1/2 tsp. salt
  • 3T olive oil
  1. Rinse and drain beans.
  2. In a medium bowl, combine all beans, onion, green bell pepper, jalapeno peppers and tomatoes.
  3. In a small bowl, whisk together dressing ingredients, add to rest of salad; mix well. Cover, and refrigerate overnight to blend flavors.   
  • 150 cal./serving. Serves 24.
     

Friday, May 7, 2010

Get Popping with DIY Microwave Popcorn

Fake microwave popcorn butter has to be one of the grossest smells wafting through my office on a regular basis. It's right up there with Korn Nuts for me. (blech!)

Did you know you could make your own microwave popcorn? I came across this idea the other day (thank you, Alton Brown!) and thought I'd share. No more fake butter smell! It's less than 200 calories! And it's cheap, cheap, cheap to make. Hurray!
DIY Microwave Popcorn
  • 1/4 c. popcorn
  • 1 tsp. olive oil or peanut oil (optional, but it makes the toppings stick to the popped corn better)
  • 1/4 tsp.  salt
  • Paper lunch bag
Toss the popcorn with the olive oil and salt in the paper bag. Fold the top of the bag over twice to close. Place the bag in the microwave and microwave on high for 2 minutes to 3 minutes, or until there are about 5 seconds between pops.
Other topper options:
  • Kettle Korn: 2 T. sugar
  • Chocolate popcorn: 2 T. powdered sugar, 1 T. cocoa powder, 1/4 tsp. salt, 1/8 tsp. cinnamon 
  • Cajun: 2 tsp. paprika, 1 tsp. onion powder, 1 T. garlic salt, 1/2 tsp. black pepper, 1 pinch cayenne pepper

    • Southwestern: 1-1/2 tsp. chili powder, 2 T. salt, 1 T. ground cumin 
    • Italian: 1/4 c. finely grated Parmesan cheese, 1/2 tsp. dried oregano, 1/2 tsp. salt, 1/4 tsp. black pepper, 1/4 tsp. crushed red pepper flakes
    • Curry: 1 T. curry powder, 2 T. salt, 1/4 tsp. black pepper, 1 tsp. turmeric, 1 pinch cayenne pepper
      Enjoy!

      Wednesday, May 5, 2010

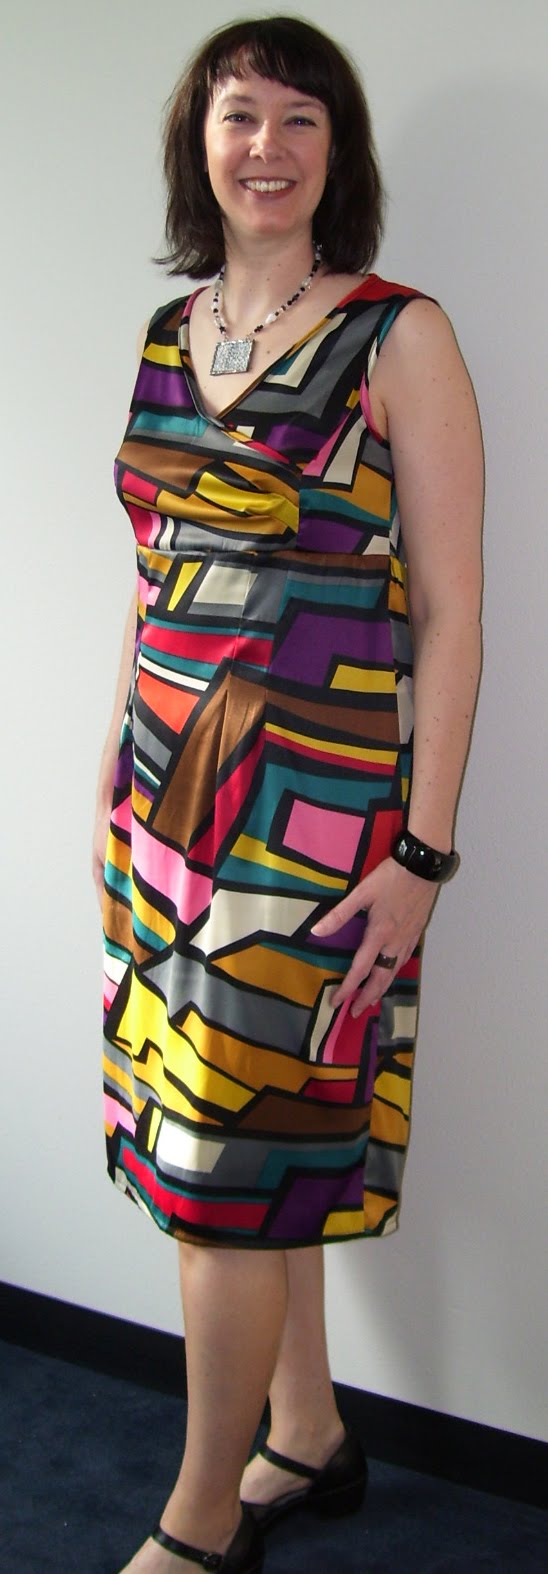
      McCall's 5974 • Mosaic Print Dress

      Does this fabric look familiar? Why of COURSE it does. I bought seven yards of this ITY mosaic-print knit when it was on a killer sale (like $4 a yard). This is the last project you'll see with this fabric, I promise!

      Pattern Description: Dresses A, B, C, D have bodice variations with front pleats, neckline variations, self-faced midriff, pleated skirt front, back zipper and sleeves in three lengths; dresses A, B have scoop neck; dress A has short sleeves; dress B has long sleeves; dresses C, D have wrapped bodice, “V” neck and self-ties; dress C has three-quarter length sleeves; dress D has long sleeves; dresses A, B, C, D length is 1" below mid-knee.

      I made view C.

      Pattern Sizing: B5(8-10-12-14-16), RR(18W-20W-22W-24W)
      Mine was a straight 14 (woo-hoo!)

      Did it look like the photo/drawing on the pattern envelope once you were done sewing with it? Better, I think!

      Were the instructions easy to follow? Super, super easy. I like that the pattern included tissue fitting instructions. I took the pattern alterations class thru the Palmer Pletsch school of sewing and found the pattern instructions to be like a mini-course. This would be VERY helpful to folks who haven't tissue-fit before.

      What did you particularly like or dislike about the pattern? That darn zipper! Who puts a zipper in a knit dress? I mean, really. That had to go. Also, the ties extend from your armpit down to your high hip. That wasn't going to work for me.

      Fabric Used: ITY Knit Jersey. This busy print covers up a multitude of sins. A solid might not be so forgiving.

      Pattern alterations or any design changes you made: This dress required far fewer adjustments than I normally do.
      • 1/2" added for the high round back
      • Added 8" to the ties to ensure that they'd be long enough to wrap around me
      • Cut the side tie width down 2" so that it would focus attention on my high waist, not my high armpit
      • I left the waist markings at the skinniest part of my waist (high waist?) so that the fabric would flow out from there. It makes me look thinner and I love that!
      • I cut the back piece on the fold, ensuring that the neckline wouldn't gape. This reduced the amount of fabric in the hem of the skirt. It may not be as twirly, but I like the streamlined back a lot.

      Would you sew it again? Would you recommend it to others? I HIGHLY recommend this pattern. It only took about 3 hours to sew, once the pattern fitting was completed.

      Conclusion: Just make it. This is a great go-to dress!